
Dots per Inch and all that nonsense
I often get students asking about printer resolutions, screen resolutions, dots per inch, pixels per inch and stuff like that. I also see people on forums saying things like ‘If you are exporting for screen it needs to be blah pixels by blardy blah pixels at 72 dpi. And it makes me weepy and sad because there is so much misunderstanding about the whole subject. So, dear reader, here’s an article that aims to dispel at least a little of the nonsense…

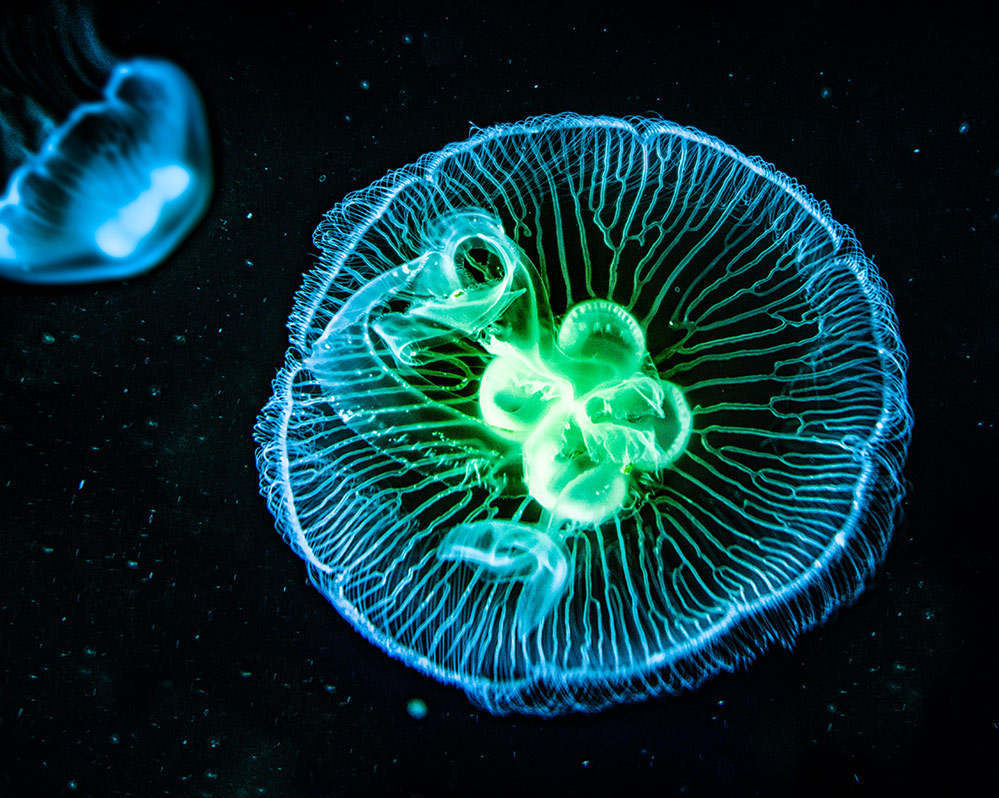
This is a photo of a jellyfish and if you want you can download it here. It’s 4560 pixels wide by 3648 pixels tall. So it’s basically a grid of little colored squares. You can call them squares. Or pixels. Or dots – it doesn’t matter what you call them, they are just small blocks of color & in this photo they are varations of black, blues and greens.
This is a zoomed in version of the photo, somewhere around the top left bit of the main jellyfish. You can probably see the small squares that make up the image, but there’s still a pretty good amount of close up detail in the photo.


So then I resized the photo to about one tenth size. This image is 456 pixels/squares/dots/blocks wide by 361 tall. But the internet hasn’t fallen over and neither has your screen (I hope.) Even though the two images have very different amounts of pixels, any website and your screen can comfortably show images with different resolutions at the same size.
I zoomed in on roughly the same area as before and now you can see the issue. The zoomed in area looks blocky because there aren’t enough little colored squares to give me the same kind of detail I had in the original photo that was 10 time the size. You can see the pixels that make up the image on a screen or if it goes to print. That’s why people get a bit… excited about dots per inch.

The Big 72 dpi myth
Once upon a very long time ago (1984) a company with a fruity name brought to market something called a Macintosh 128K. It came with a mouse as standard and you could draw with it, which was a pretty big deal back then. It had a screen built into the computer.
The screen was 9 inches diagonally. It was capable of displaying 512 pixels along by 342 pixels down.
Now the computers were designed to work with Apple’s ImageWriter printers which had a print resolution of 144 dots per inch. Which is 72 x 2. The theory was that it made what you see on the screen the same as what you would see printed out so a standard protocol of 72 pixels per inch was established.
That was over 35 years ago. Below is an image of the dear old original Mac along with some more modern devices that use screens and I’ve painstakingly laid out the different pixels per inch for each device:

Ok so if we’re going to have to be precise about this, a modern Mac retina display varies slightly from model to model but they are in the 220-227 pixels per inch range. The Microsoft Surface models vary from 148 to 267 pixels per inch. You hear a lot about 4K monitor these days and that means 3840 by 2160 pixels.
But the actual pixels per inch will depend on how many inches along by inches down those pixels will be stretched into. And that’s kind of the whole point.
It’s obvious that Apple, Microsoft, all the monitor makers and everyone else have moved on from a 35+ year old standard. In fact the 72 pixels per inch protocol was thrown out of the window within months of it being established. For the simple reason that there are lots of different sized screens and even within a product family like Apple or Microsoft, the amount of pixels there are in any square inch of a screen clearly varies. You cannot have a 72 pixels per inch (also known as ppi) standard when there is no standard screen size or native resolution.
It’s like taking a handful of sugar cubes and imagining they will fill any bowl you put them into, no matter what size the bowl is.
So where does that leave you? In a pretty good place actually. Ever used an image editing package? If you are reading this, then probably. Ever opened a 4560 pixels wide by 3648 pixels tall image like the jellyfish image? It has more pixels than even a 4K monitor has, yet it happily opens. Ever zoomed in on an image? The image doesn’t magically change the amount of pixels it has when you do so.
That’s because any monitor can handle images that have different amounts of pixels to its screen resolution. You wouldn’t be able to zoom in and out of any image if it didn’t. Your monitor looks at the image that’s sitting on the other side of the glass. It sees how many pixels of your image pixels are clumped under each of its own screen pixels and works out what color each of its screen pixel should be. If you scrub zoom in or out of the image, your monitor will readjust to the new zoom level in real time. The resolution of your screen and the resolution of your image are two separate things. Every monitor knows this and can handle it. Easily.
But there are other things to think about. The bigger the file in pixels the more memory it takes up which means slower load times on the internet. So when I created the various images for this article I resized them down using the Resize Image command so that the web page loads faster. Along with lowering the quality of the jpg which also drastically reduces the file size.
Also, if you are uploading images to any social media site like Facebook, it will automatically resize your image to fit so you don’t have to do anything. If you don’t want your image resized by whatever method they use then resize it beforehand. That way you get more control over the look of it. Also some sites like photography sites will insist that the files you upload will be a minimum or maximum pixel size. So you find out what that size will be and resize your images before you upload them.
Well that’s all good news. Now what about printers? Here’s some printer eye candy for all you printer spotters out there…

The Big 300 dpi myth
For your viewing delectation there’s a couple of modern desktop printers on the left, an old daisy wheel printer bottom right plus an offset litho machine top right.
I’m sure you know what a desktop printer does. You get hundreds of different models and hundreds of different maximum dots per inch that they are capable of printing out to. Remember that old Apple printer we were talking about earlier? It could print to 144 dots per inch, also known as dpi.
The top right offset litho printer is the kind commercial printers use and typically have print runs of hundreds, thousands – tens of thousands of books, magazines and so on.
Now the $64,000 dollar question is, if you are sending your image off to be printed, what resolution should it be? Put another way, how many dpi should it be?
Your printer doesn’t care what dpi your image is supposed to be. There is a widespread myth that a printer has to get the exact amount of pixels to print an image at 300 dpi – eg to do a 4 by 6 print it has to be 1200 pixels by 1800 or the whole thing won’t work. But it isn’t true. Your printer doesn’t care what dpi your image is supposed to be. It just takes the image, you give it an idea what size you want it to be and it prints it. It can take the same image and print it in a whole variety of different sizes. You don’t have to resize your image to make your printer happy. It’s the same as your computer screen. You can zoom in or out on the same image as much as you want and the screen just works it out. Your printer does the same thing. It doesn’t need a certain size to function.
As for 300 dpi, that’s what some people agreed would be the resolution you want to print at so that you can’t see the dots that make up the picture. But that also would depend on things like whether the paper is shiny or matte. If it was matte the ink would absorb and spread into the paper more so you would require fewer pixels per inch. Also I’ve worked with a few large publishing houses in my time and they printed out at 240/250 dpi and no one ever seems to complain how they can see the pixels that make up the pictures in the magazines.
It also depends how far away the final image will be. Here’s a billboard poster…

You think the printer insisted the jellyfish image had to be 300dpi on a poster that size? Me neither.
What you can take from this is that 300dpi, also sometimes referred to as 300ppi (points per inch instead of pixels per inch & why on earth would that be confusing..?) is a figure that’s been come up with as a matter of opinion. It is not a technical requirement. It will not break a printer if it gets fed an image that will print out at less than 300dpi. The worst that will happen is that the image will look blocky because you will see pixels that make up the image.

If you are creating a file that needs to be 10 by 10 inches then any image editor will let you specify the file size in inches and also let you enter dpi like we can see here. You will get a file that’s 3000 pixels by 3000 pixels. You could also specify a file size in centimetres and select 300 dpi and the computer will just work it all out. But – there is no magical dpi setting that is stored along with the regular pixel dimensions. There’s just pixels in an image file and the only dpi you have to think about is when you are sending the file off to be printed.
Don’t get me wrong. 300dpi is a sensible size to aim for when you are sending something to print and many technical directors or print houses will ask for it. You give them what they asked for.
If you want to crop your picture for aesthetic reasons (a certain ratio or to enhance the composition/get rid of elements) then just do so and concern yourself with how it looks rather than what dpi it is. Then if you end up with an image that would print out as significantly smaller than 250/300 dpi go to the top menus of whatever program you are using and select Resize Document… . From there you can type in 300 dpi and the size in whatever unit of measurement you are using. So for a 4 by 5 print you’s enter 4 in one size box, 5 in the other and 300 dpi in the relevant field.
As for the resample method choose Bicubic or one of the two Lanczos resize methods. If you do so I’d suggest going round your picture at 100% zoom and checking for little glitches and maybe fixing them using something like the inpainting bush tool.
To do a high quality print you it’s generally considered important that you have a resolution of 300 dpi/ppi – that is, 300 dots or points per inch. So, just once more, for a 10 by 8 inch photo you’d need 300 x 10 = 3000 for the long edge and 8 x 300 = 2400 for the short edge, so a file that measures at least 3000 pixels by 2400 pixels.
But if your file is larger that’s really not a problem. Printers can handle larger sizes. And smaller sizes. The only dpi that’s fixed in stone is the one in the minds of people who don’t know the difference between fact and myth in the wonderful world of points per inch, pixels per inch and dots per inch. But now, you’re not one of them. Thanks for reading!
If you found this article to be useful check out my courses at Udemy. Click on the link go go to the course of your choice
Affinity Photo: Solid Foundations
Affinity Designer: Solid Foundations
The Craft of Photoshop: Solid Foundations
Affinity Designer for the iPad
Affinity Photo: The Little Box of Tricks
Affinity Photo: Beginner to Pro via Reference and Workflow
Affinity Photo: Modern Special Effects
Affinity Photo for the iPad: Special Effects